 Save
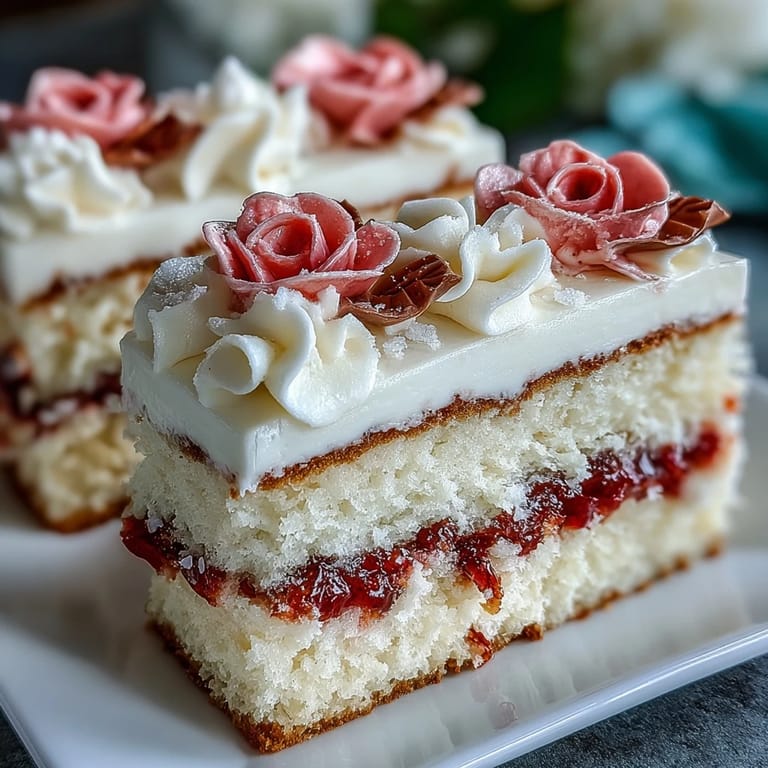
Save There's something magical about the moment you pull a perfect sheet cake from the oven and realize you're holding the centerpiece of someone's big celebration. My friend Sarah called me in a panic two days before her graduation party, asking if I could tackle a homemade cake instead of ordering one, and I found myself mixing this vanilla batter at midnight, thinking about how the smell of butter and cake would fill her kitchen for hours. The simplicity of the recipe caught me off guard—no fussy techniques, just honest ingredients working together to create something that tastes like genuine celebration. When I finally piped those buttercream roses the next afternoon, each one felt like a small promise that this cake would be the kind of thing guests actually remembered.
I still think about the way Sarah's roommates gathered around the kitchen counter when I unveiled the finished cake, their phones instantly coming out to capture every angle of those roses. One girl literally gasped and asked if I'd bought it from a bakery, which might be the highest compliment a homemade cake can receive. That moment taught me that cakes like this one aren't just dessert—they're tiny edible declarations that someone's achievement matters enough to warrant something beautiful and handmade.
Ingredients
- All-purpose flour: The foundation of a tender, structural crumb; make sure it's measured correctly by spooning it into your measuring cup rather than scooping directly from the bag.
- Baking powder and baking soda: These two work together to create gentle lift and ensure the cake rises evenly without becoming dense or gummy.
- Unsalted butter (cake portion): Room temperature is non-negotiable here because cold butter won't cream properly, which means you'll lose air incorporation and end up with a heavier cake.
- Granulated sugar: The creaming process with butter is where the magic happens, so give yourself a full 3 to 4 minutes of beating until the mixture looks pale and airy like whipped cream.
- Eggs (room temperature): Cold eggs refuse to emulsify smoothly into the batter, which creates a grainy texture that no amount of mixing will fix.
- Vanilla extract: Pure vanilla makes a noticeable difference in flavor depth compared to imitation, especially in something as simple and elegant as this cake.
- Whole milk (room temperature): The alternating method of adding flour and milk creates a more tender crumb than adding them all at once.
- Unsalted butter (buttercream portion): This is your piping foundation, so beat it alone for a minute until it's pale and fluffy before adding the sugar.
- Powdered sugar (sifted): Sifting removes lumps that would otherwise create a grainy texture in your buttercream and make piping frustrating.
- Gel food coloring: This matters more than you'd think because gel won't thin out your buttercream the way liquid coloring does, which keeps your roses from becoming soggy.
Tired of Takeout? 🥡
Get 10 meals you can make faster than delivery arrives. Seriously.
One email. No spam. Unsubscribe anytime.
Instructions
- Prepare Your Pan:
- Grease the 12x18-inch sheet pan generously with butter, then line it with parchment paper that hangs slightly over the edges so you can easily lift the cake out once it's cooled. This prevents sticking and gives you clean edges to work with.
- Combine Dry Ingredients:
- Whisk the flour, baking powder, baking soda, and salt together in a medium bowl until they're evenly distributed. This ensures the leavening agents are spread throughout the batter rather than creating pockets of over-rising.
- Cream the Butter and Sugar:
- Beat the room-temperature butter and granulated sugar together in a large bowl for 3 to 4 minutes until the mixture is pale, fluffy, and noticeably lighter in color. This incorporates air that will make your cake tender and light.
- Incorporate Eggs Gradually:
- Add one egg at a time, beating well after each addition before moving to the next. Adding them slowly ensures they emulsify properly instead of creating a curdled-looking batter.
- Mix in Vanilla:
- Stir the vanilla extract into the creamed mixture and beat until combined. It only takes a few seconds.
- Alternate Wet and Dry Ingredients:
- Add the flour mixture and milk in alternating turns, starting and ending with flour, and mix just until combined after each addition. Overmixing develops gluten and toughens the crumb, so stop as soon as you don't see streaks of flour.
- Bake the Cake:
- Pour the batter into the prepared pan and smooth the top with an offset spatula. Bake at 350°F (175°C) for 30 to 35 minutes until a toothpick inserted in the center comes out clean and the cake bounces back slightly when touched.
- Cool Completely:
- Let the cake cool in the pan on a wire rack for at least 2 to 3 hours, or overnight if possible, before decorating. A warm cake will melt your buttercream and make piping nearly impossible.
- Prepare the Buttercream:
- Beat the room-temperature butter alone for about a minute until it's pale and fluffy, then gradually add the sifted powdered sugar while continuing to beat. Add the milk and vanilla last, and beat for another 5 minutes until the buttercream is smooth, spreadable, and light.
- Divide and Tint:
- Divide the buttercream into separate bowls and add gel food coloring to create your rose, leaf, and accent colors, keeping a portion white for the base layer. Mix each color thoroughly and adjust intensity as needed.
- Crumb Coat the Cake:
- Spread a thin, even layer of white buttercream over the entire cooled cake using an offset spatula. This seals in any crumbs and creates a smooth surface for piping roses.
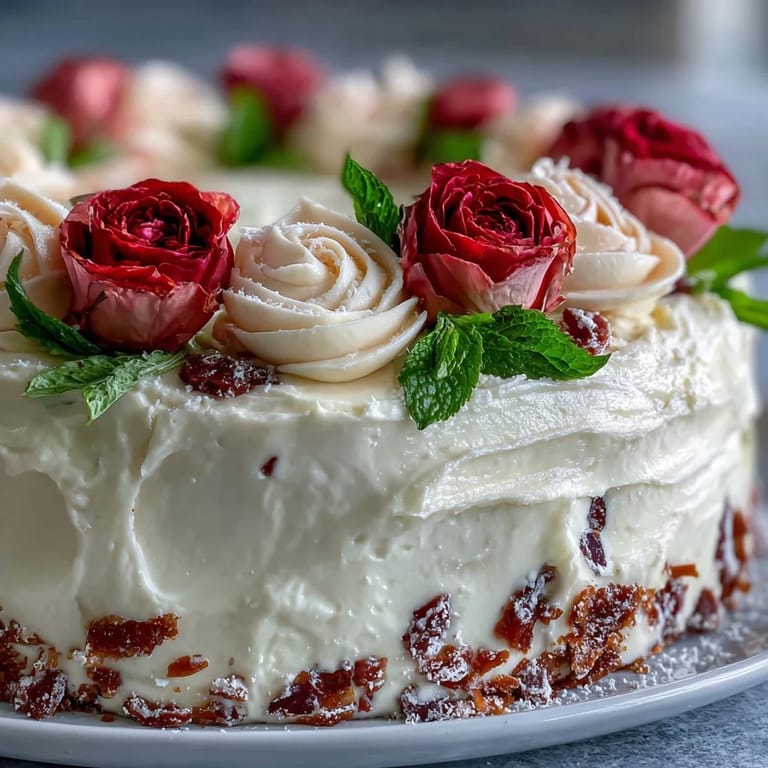
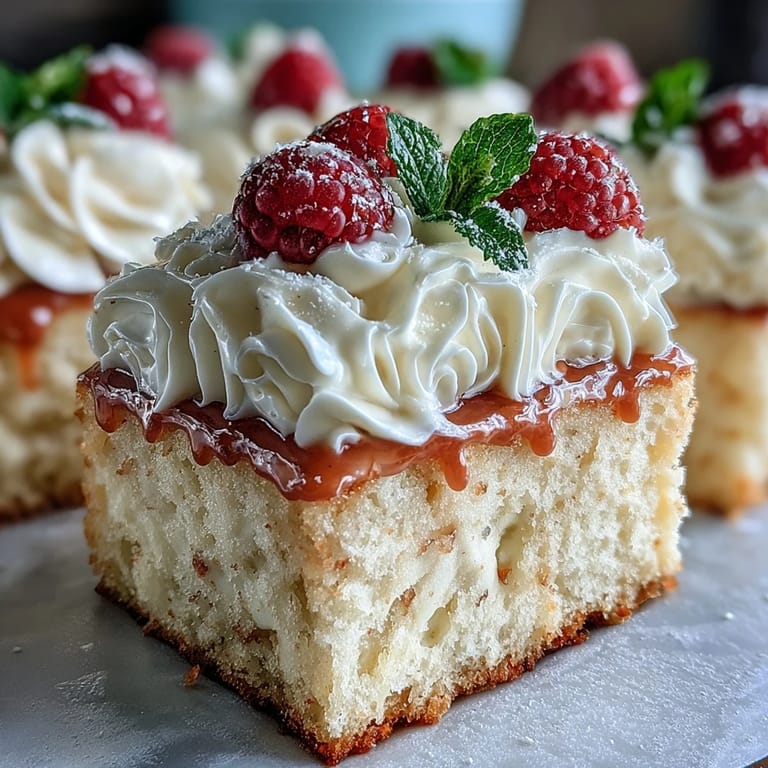
- Pipe Your Roses and Leaves:
- Fit piping bags with a petal tip for roses and a leaf tip for leaves, and pipe your designs across the cake in clusters or as a border. Start with the darkest or boldest rose color first, then layer in lighter shades for depth and visual interest.
- Add Your Message:
- Fit a small round piping tip to a final bag of buttercream (white or a coordinating color) and carefully pipe your graduation message or congratulations across the cake in a readable space.
 Save
Save The most rewarding part of making this cake happened when Sarah's grandmother tasted a slice and said it reminded her of her own wedding cake from fifty years ago, right down to the buttercream roses. In that moment, I understood that a sheet cake decorated with piped flowers isn't just a dessert—it's a small, edible heirloom that connects celebrations across time.
Why Buttercream Roses Matter
There's a reason buttercream roses have become the signature of special-occasion cakes: they're forgiving, they look genuinely impressive, and they taste infinitely better than fondant or other decorative mediums. I used to think piping roses required some kind of inherited gift, until I sat down with a tutorial video and realized it's just a muscle memory thing—the petal tip does most of the work if you trust the motion. Once you've piped five or six, your hand stops second-guessing itself and the roses start emerging with actual personality and dimension.
Timing Your Bake
The beauty of a sheet cake is that you can bake it days in advance, wrap it well, and store it at room temperature without worrying that it will dry out. I often bake mine two days before an event, wrap it in plastic wrap, and then decorate it the morning of, which means less stress and more time to focus on making the roses look polished. The day-before approach also gives the cake time to firm up a bit, which makes it easier to crumb coat and pipe without the buttercream sinking into a soft, warm cake.
Variations and Personal Touches
While the classic vanilla version will always be my go-to, this cake is genuinely flexible once you understand the ratios and techniques. You can easily swap in chocolate by replacing 3/4 cup of flour with 3/4 cup of unsweetened cocoa powder, which creates a richness that pairs beautifully with the buttercream roses. I've also experimented with almond extract instead of vanilla, lemon zest folded into the batter, or even a thin layer of jam spread under the buttercream for subtle flavor depth.
- For a chocolate version, use cocoa powder as your substitution and consider piping roses in cream or pastel colors for contrast against the darker crumb.
- A thin layer of apricot jam or lemon curd under the buttercream adds sophistication without complicating the technique.
- You can pipe roses in advance and freeze them on a parchment-lined tray, then thaw them briefly and place them on the cake just before serving.
 Save
Save This cake has shown up at graduations, anniversaries, and just-because celebrations in my circle, and it never fails to feel special. There's something about serving a handmade, butter-and-sugar creation that tastes as good as it looks—it's the kind of dessert that lingers in people's memories long after the last crumb is gone.
Recipe FAQs
- → What kind of flour is best for this cake?
All-purpose flour provides the right balance of structure and tenderness to create a moist and soft cake texture.
- → How do I achieve vibrant buttercream roses?
Use gel food coloring for rich hues without thinning the frosting. Tint small portions of buttercream before piping.
- → Can this cake be prepared ahead of time?
Yes, the cake can be baked and frosted a day in advance. Store covered at room temperature or refrigerate for freshness.
- → What piping tips work best for the roses and leaves?
Petal tips are ideal for creating delicate rose petals, while leaf tips help form realistic green leaves around the flowers.
- → How should leftovers be stored?
Cover the cake tightly and store at room temperature up to 2 days, or refrigerate for up to 5 days to maintain quality.
- → Is there a way to make a chocolate variation?
Yes, substitute ¾ cup of flour with unsweetened cocoa powder to create a chocolate version with similar texture.